


18 Mar Kitchen Dining Makeover – Makeover Monday


Kitchen Dining and Table Makeover
New Digital Download-Download and print from your computer to use however you want!
BUY NOWThey say the kitchen is the heart of the home and that most families spend a lot of time there together.
We definitely do. We try to make eating together as a family a priority as much as possible. Sometimes that’s a little tricky with all of our different schedules but we make it work!
One of my favorite things about this house when we were looking at it was the potential in the kitchen area.
The entire back side of the house has these dreamy picture windows, aside from the master bedroom which has a sliding glass door to the outside. These windows are my absolute favorite!!
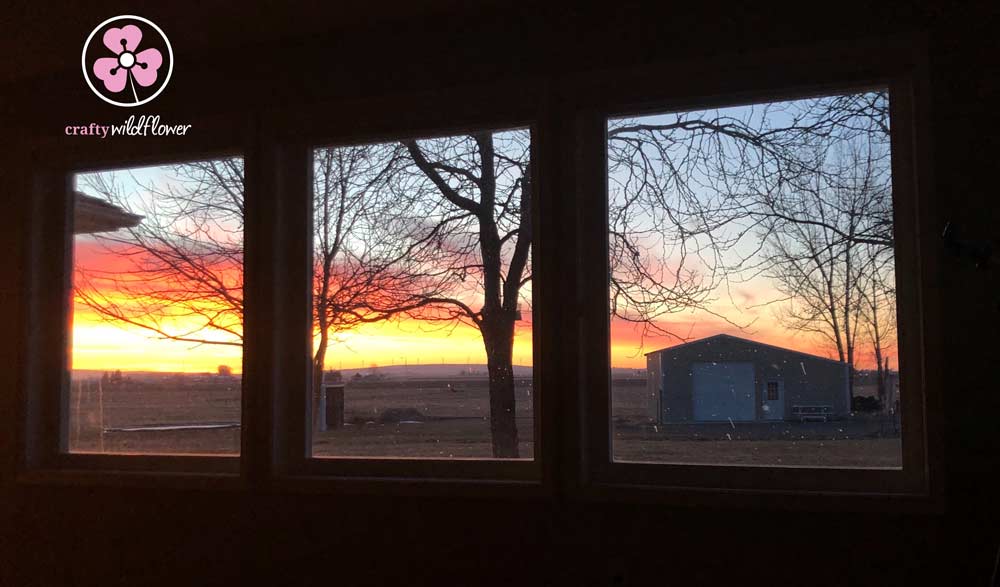
I wouldn’t have been able to move from sunny Arizona to wintry Idaho without these windows that allow so much light into our home.
Just take a look at the beautiful sunsets that we’ve caught while looking out towards the windmills and across our green ocean.
And it’s just as gorgeous in the winter.
So, back to that sweet little spot in the kitchen…
It’s our gathering place where eat dinner, chat about life and play endless board games.
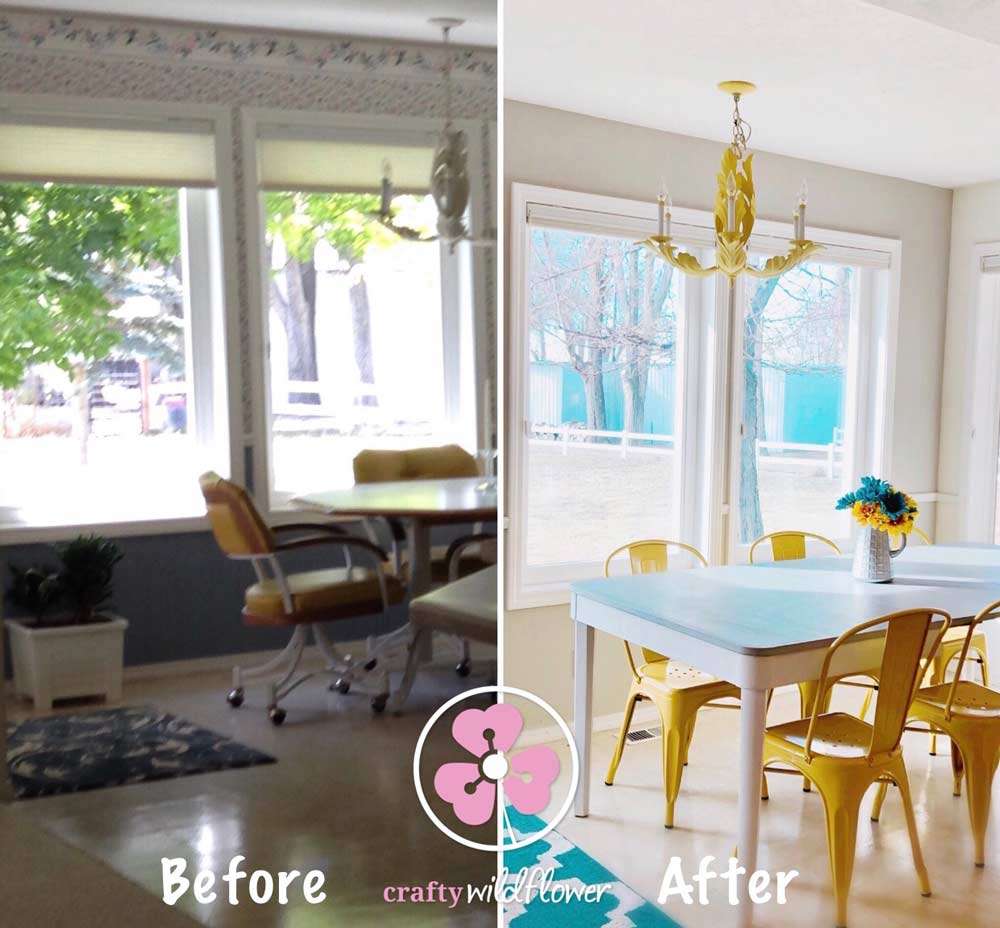
I had great plans for this spot when we first moved in. I love to make something old look new and refreshed.

And that’s exactly what we did in our kitchen dining area.
Starting with removing the old wallpaper.
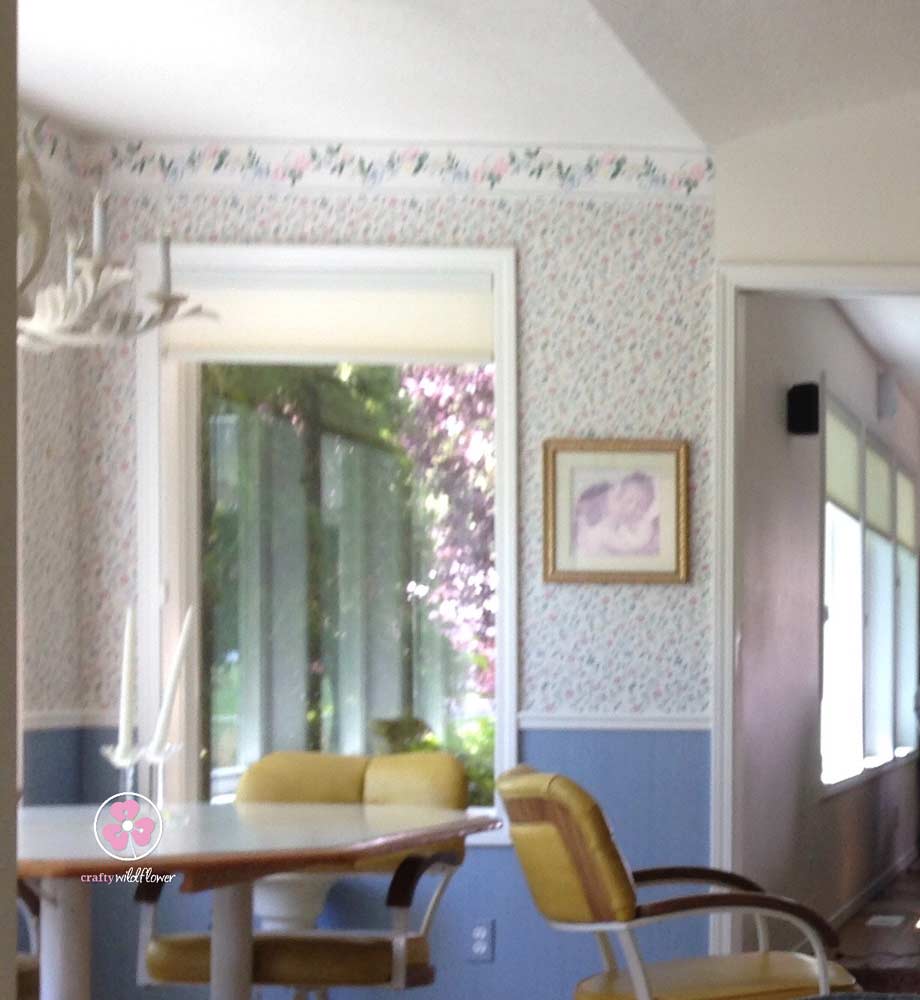
It was blue on the bottom with a floral print on the top and we wanted to take that area to a light greige color.

We used our trusted steam method that I’ve talked about here and here to get that old sticky wallpaper to peel right off.
You can find the steamer here
It is the most reliable way we found to easily remove any wallpaper. It just takes time and patience and the wallpaper will literally peal right off the wall, leaving little to no damage to repair after the wallpaper is removed, which is great! In some spots we had to heat up the glue that was left after the wallpaper was removed. We did this with the steamer, wash cloth and a bucket of lightly soapy water. Just go over the glue residue with the steamer until it’s warm enough to wipe off with the wet wash cloth. Keep your wash cloth rinsed so you don’t end up smearing any of the wet glue back on the wall.
After we had all of the wallpaper removed and the wall scrubbed of any remaining glue, we were ready to paint. We stuck with our favorite grey color, Benjamin Moore Revere Pewter. I can’t say enough good things about this color of paint. It is the PERFECT neutral gray color!
Anyone out there ever painted walls with textured ceilings? If so you know how challenging this can be. We tried several different methods that we researched on the internet. First we tried tapping off the ceiling and using painters caulk to seal the tape.
It didn’t work… at least not for us and our ceilings.
Next we tried buying the more expensive bullfrog tape that is supposed to fill in the gaps with a gel like substance.
That was a flop.
Then we had an idea, or a mixture of ideas that suddenly came together after all of our research and failures. And you know what, this one worked! Like really really worked. If you have the patience to use this method, I promise you it will work.
Heres what we did:
We aren’t a fan of the textured ceiling but we aren’t ready to take on that huge project of removing the texture just yet.
So we paint matched a gallon of paint to match the existing off white color of the ceiling.
Next we taped off the area to be painted and painted one coat of the ceiling color on our wall, but only a small cut in area close to the tape.
We let that dry, and painted another coat.
Then we painted one coat of Revere Pewter over the top of the two coats of the ceiling color and let that dry.
Then another coat of Revere Pewter.
After the final coat we immediately removed the tape from the walls at a 45 degree angle.
The result is magic! I’m not kidding, we tried everything before this and this was the only method that worked!
What happens is the ceiling color bleeds under the tape, to the ceiling, and seals in all the little gaps and bumps to form a barrier for the wall color. Be careful not to saturate your tape from the beginning, you will need to put 4 coats of paint over it and it will loose its adhesion quality if you use too much too soon!
So there you have my secret for painting walls with textured ceilings. It took effort and time but the result was exactly what we were looking for.
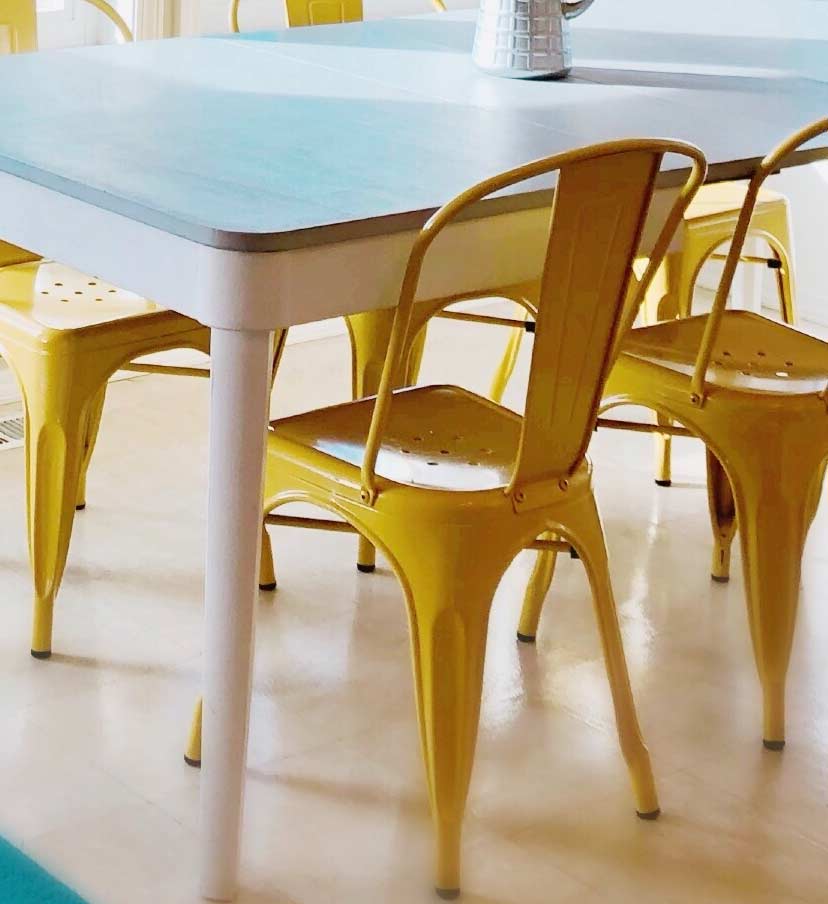
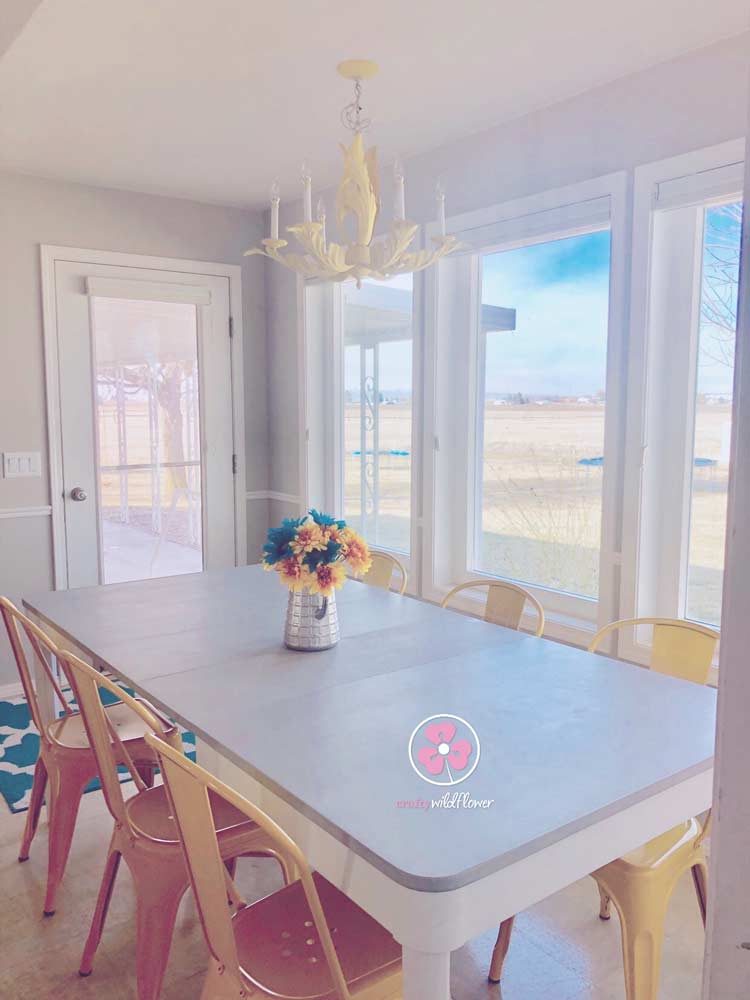
After we had the walls painted we started on our table makeover. We were lucky enough to get Brandon’s Great-Grandma’s old kitchen table that was heading for the dumpster. It was solid and sturdy but was in need of an updated color and look. So we revived it with some gray and white chalk paint.
For this project I used Rustoleum Aged gray on the top, Rustoleum Linen White on the legs, and this Rustoleum top coat.
If you have ever used chalk paint you know how wonderful it is!! It’s a super easy and effective way to refresh any tired old furniture and bring it back to life. It requires no sanding or prep work so it’s a major time saver. I used two coats of gray on the top and two coats of white for the sides and the legs.Then I sealed it with two coats of clear top coat. It was an easy project that I was able to complete is just a few hours.
I LOVE it!!
And I really love that we were able to use something that has been in the family for generations, repurpose it and use it in our own home home. My kids are eating at their Great-Great-Grandmother’s table, and I think that’s pretty neat!
After we had the table painted I was on the hunt for chairs to match my color scheme. Something I try to always do is stick to three main colors. One or two base colors, and two accent colors to decorate with.
In this part of our home, which has an open concept and flows between several adjoining rooms, I’m using teal blue and mustard yellow as my accent colors. The carpet and flooring (which will be redone eventually, starting with a project for the kitchen tile and I”m excited to get started on it!) is white, my furniture is gray or black and then I add accents of mustard yellow and teal blue. I like these colors because I can easily transition them to more of a fall theme or a spring theme.
Back to the chairs….
I wanted mustard yellow metal chairs to go around our newly painted table. I searched several options and finally decided on these from Target (they aren’t in their stores anymore so you can find almost identical ones here)
I had read the reviews, and some felt they were too small, so I made a trip to the store to test them out before I made the purchase.
They have worked just fine for us but if you are on the tall side you might want to test them out if you can find them in your store (or get them from amazon with free returns) before making the purchase.
After completing the painting of the walls and the table, the kitchen area stayed that way for several months and I liked it but something kept nagging at me to paint the chandelier. Yikes!!
I really wanted to try it but what if I hated it?
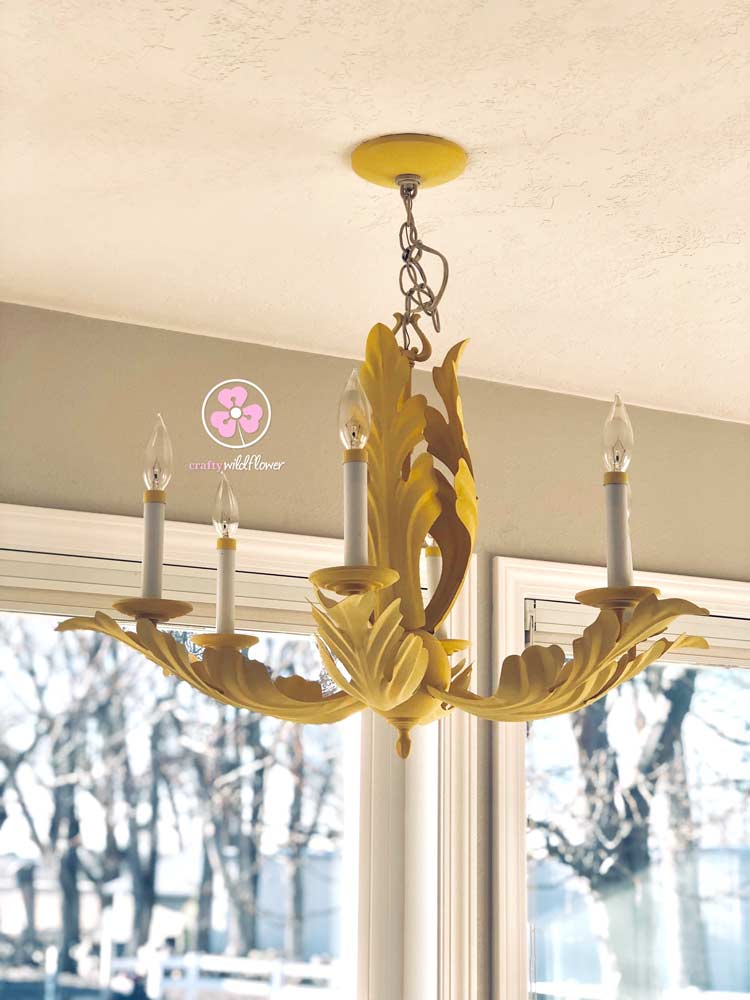
Then I just decided to go for it, and painted it a light mustard yellow color.
I was a little nervous that it would be overkill on the yellow color or that it may not flow well with the yellow color of the chairs but it ended up being just the look I was going for.
Here is the end result.
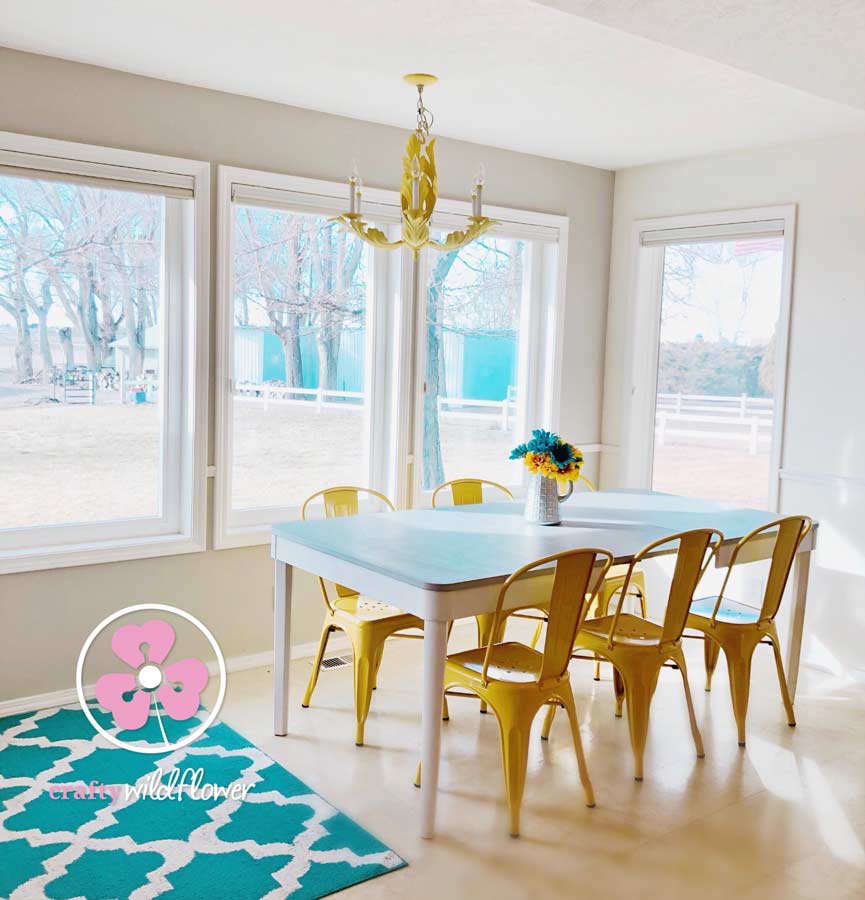
I found an old water pitcher and gave it a fresh coat of silver paint, you can find something similar and already painted here.
I then filled it with gold and teal flowers and used that as my center piece. Mustard yellow flowers
Teal flowers
Watching the morning sunrise through those dreamy picture windows while we are all around the table eating breakfast or the unbelievable sunsets that bless this spot while we are together eating dinner, around Great Grandmas table, is nothing short of absolute serenity.
I love that this is what my family gets to come home to after a day out in the chaotic world.
Peace, yellow happiness, and beautiful sunsets and I hope it’s something they will always remember.
XOXO
Susan
Sorry, the comment form is closed at this time.